Lint Lint Lint

One of the greatest shortcomings in house design and construction has to do with fans and the movement of air in general:

The fan you see above just happens to be in my own apartment bathroom, but there are millions of these all over everywhere.  And a lot of them . . .  just don’t work.

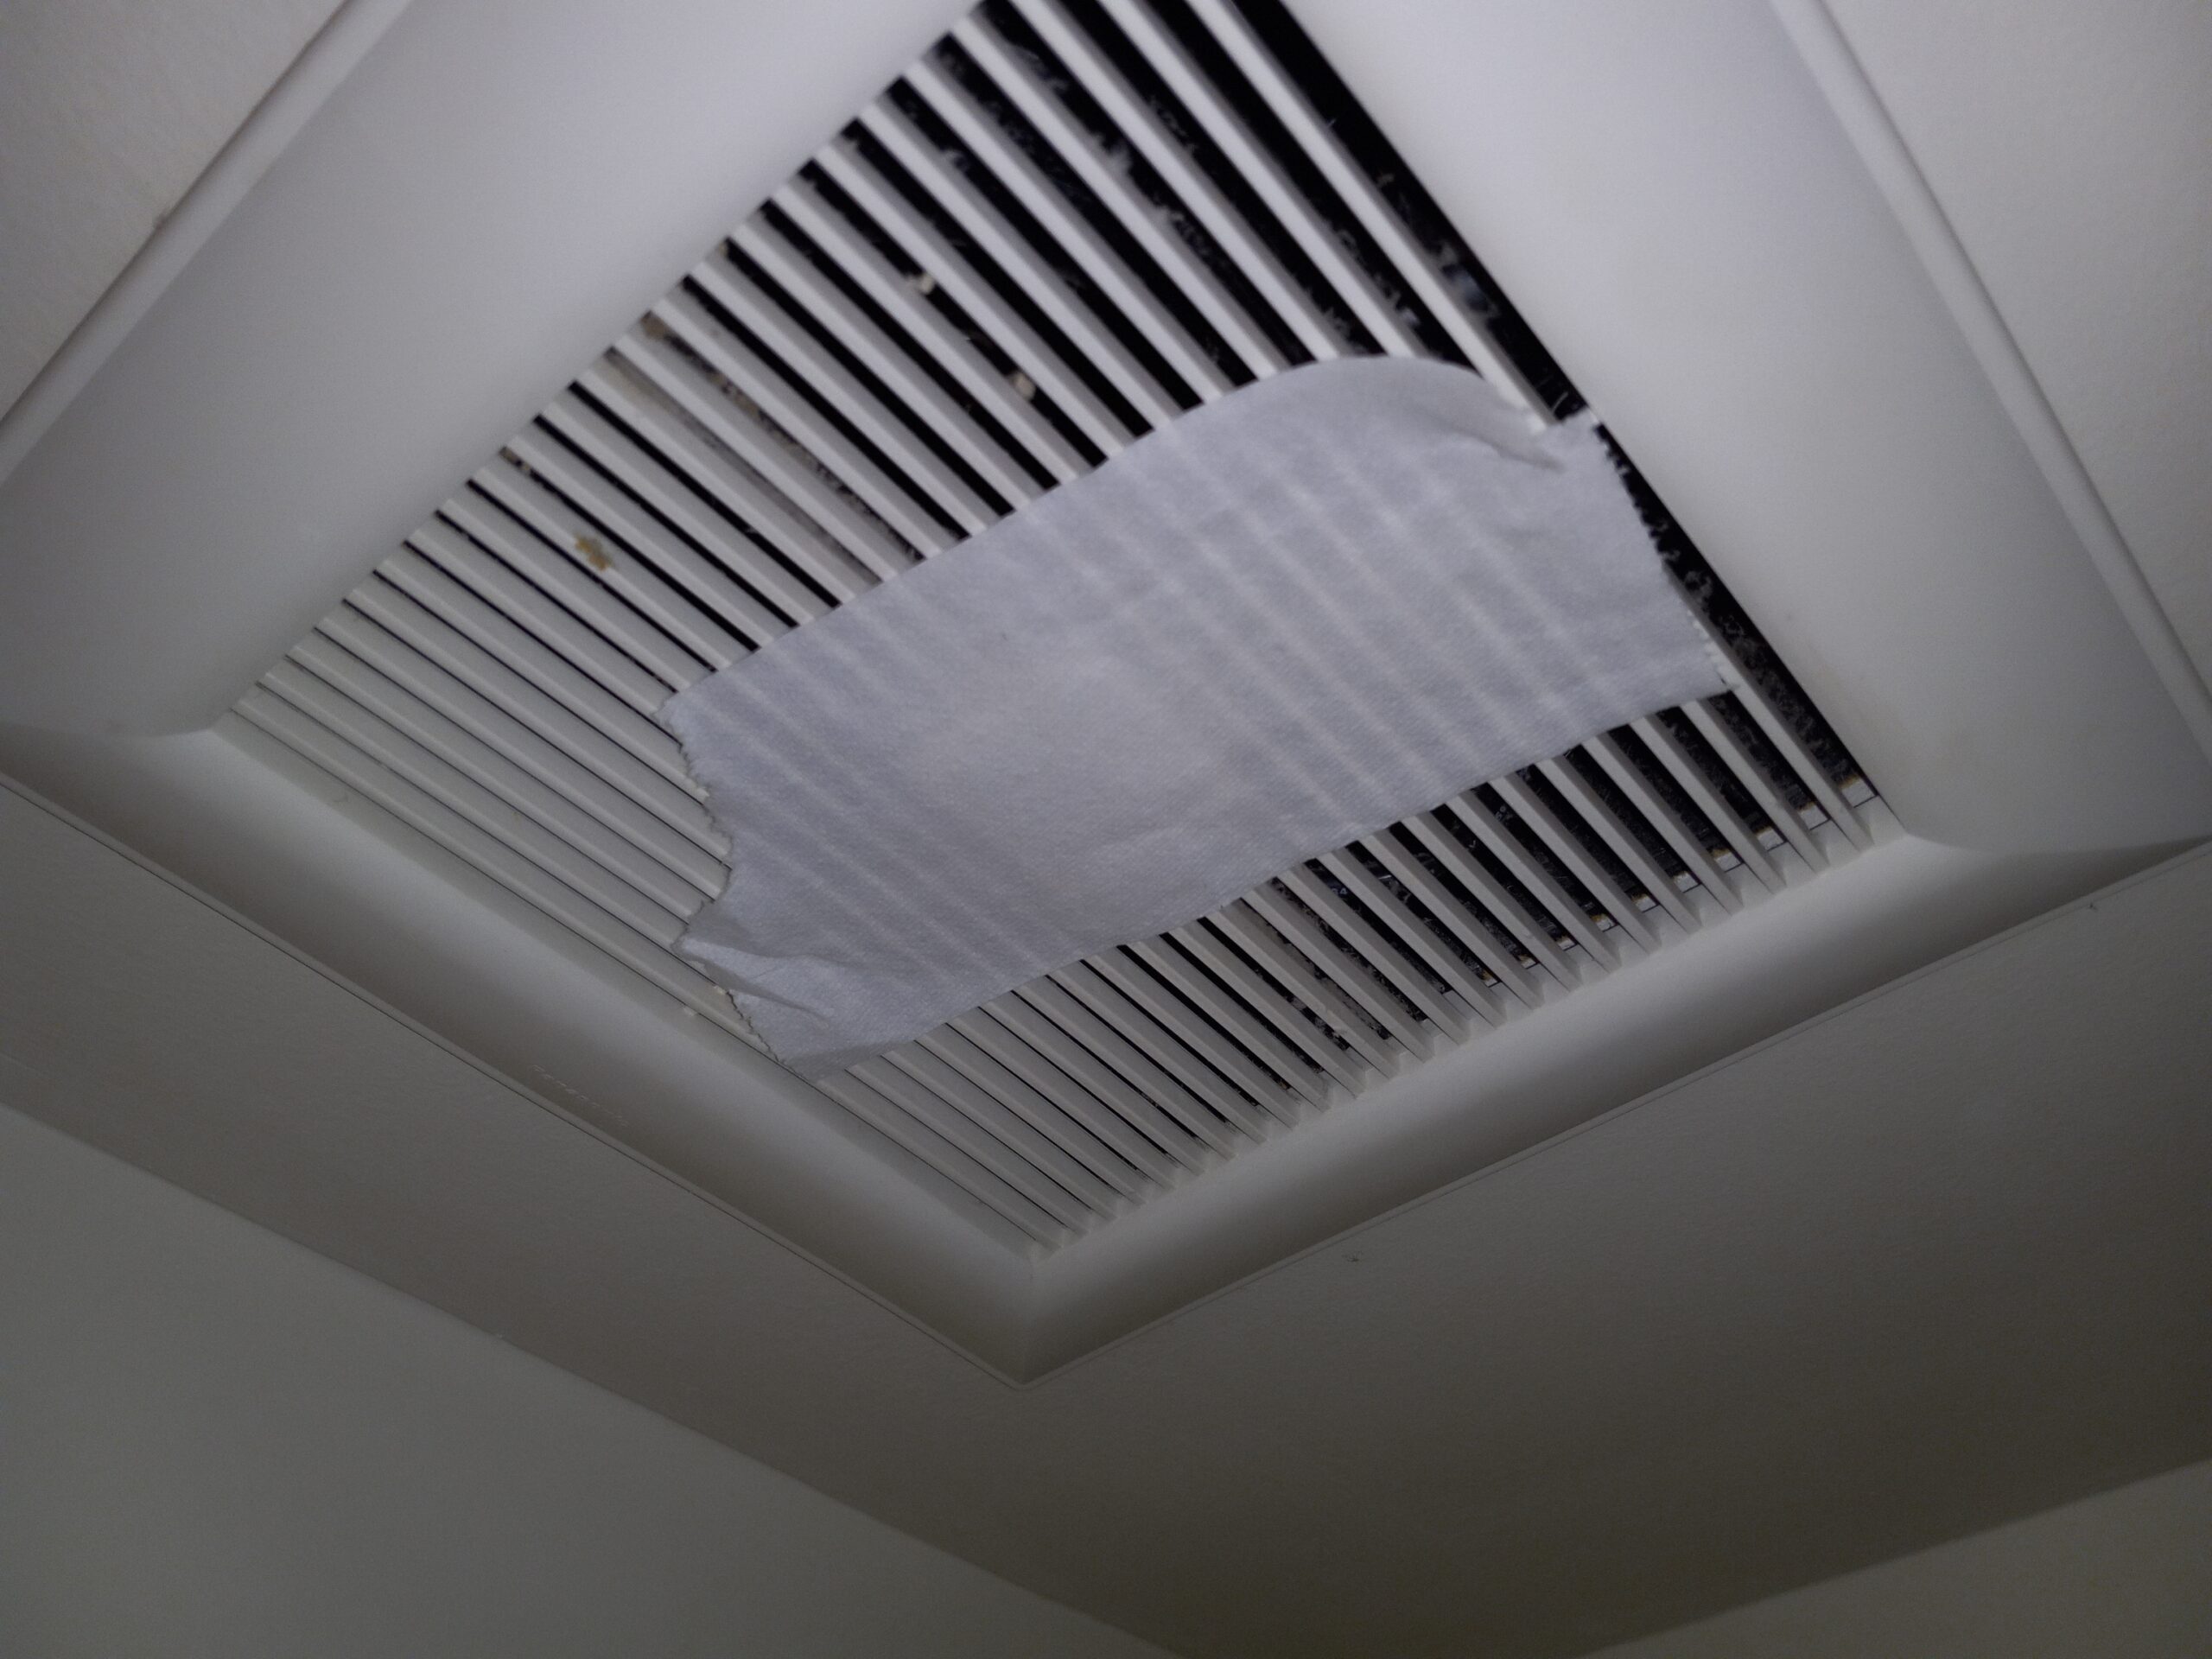
Of course, if you turn them on, it will spin around and make fan sound, but if you perform the acid test, which is, if you hold 2 squares of toilet paper against the vent and then take your hand away, most times the toilet paper with just fall to the ground.  If it does that, you immediately know there is no suction of air occurring.  It’s fan theater.

Oh sure, they worked when they were first installed, but then, as the damp air from the shower gets sucked out, the lint and dust that is also in the air hits the water on the fan blades and sticks there, and over time it builds up.  And as it builds up, it eventually distorts the curve of the “squirrel cage” fan blades and renders them useless.  Sort of like icing on airplane wings.  And, not to pile on, if that fan stops functioning, you get moisture buildup, and thus mildew and mold.

The only fix I know of is to get up there with a vacuum and clean it out one blade at a time:

This takes us to a broader topic having to do with customer relations.  I personally hate it when people “upsell” me and I never do that to clients.  Handymanning is a consulting job, and the relationship, and mutual trust, is key.  But then there’s the conflict of knowing that in every new customer house I walk into, there is an 80% likelihood that every fan in that house is somehow gummed up with lint, and the function of that fan is compromised.  This includes bathroom vents, window air conditioners,  furnace blowers, clothes dryer vent pipes, and perhaps worst of all, refrigerators.  And now here is Justin looking like he is pressuring you into buying something you didn’t think you needed or wanted.

The hell of all this, I don’t want this job.  I do not like to clean.  I fix, I don’t clean.  But in this arena, cleaning is fixing and making things work.  It is also saving energy and carbon dioxide emissions.  Plus, the life of your appliances is shortened when gunked up fans and air filters are making the thing run 50% longer than it needs to.    And I did not even mention what all that dust does to your lungs as it gets constantly blown thru your house.  So I put up with it, as virtually no “house cleaning” service addresses this kind of thing.

Trouble is, the average home owner is simply not at all educated on this need for preventive maintenance.  The manufacturers don’t care, they would rather you remain ignorant and be forced to just buy all new everything.  So, dear reader, I put it to you: should I not risk sounding like a pesky car salesman selling rust proofing, or do I bring it up and suggest that folks address the lint in their house that is killing their appliances, crudding up their lungs and sinuses,  and costing them $10 a month in extra electricity?

____________________________________________

Addendum:

After posting this blog I had a regular client call about something else and while there I suggested that we look at her bathroom ceiling fan.  I pulled off the cover and this is what I found:


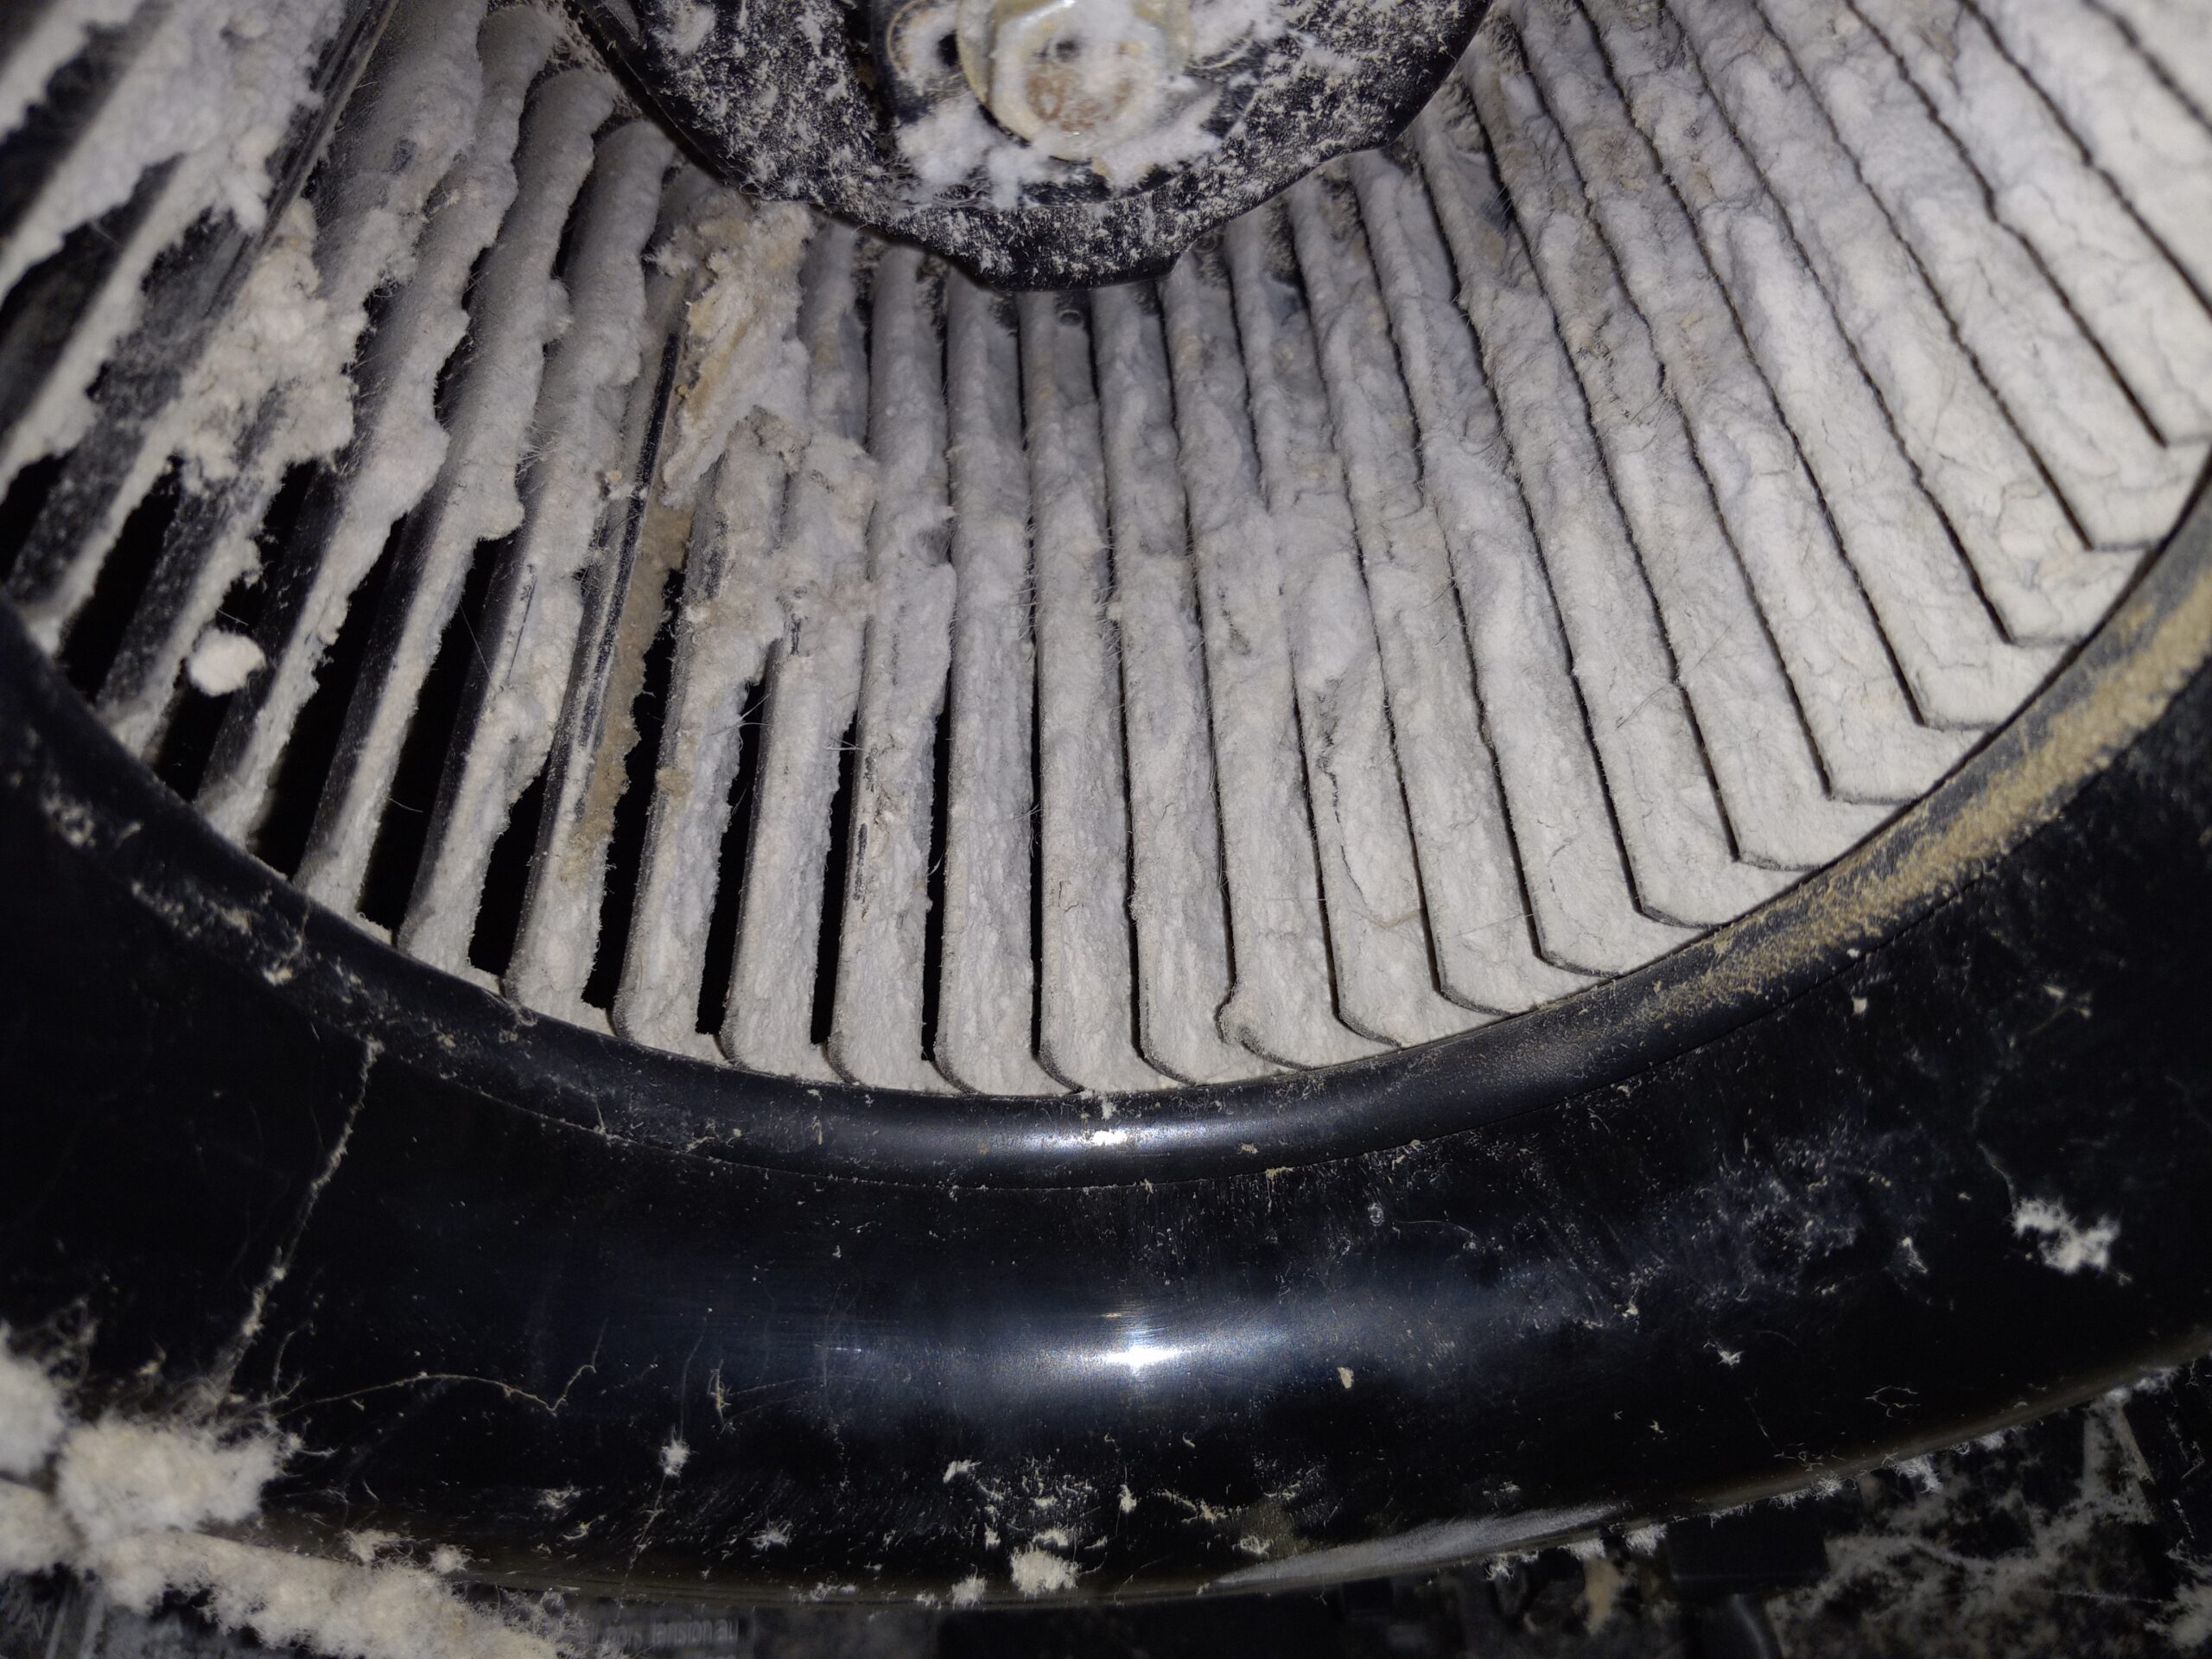
  Again, when those curved fan blades get all coated with a layer of dust they become totally non-functional.  This took a while but I got enough crud off the blades to at least to make the thing work again,

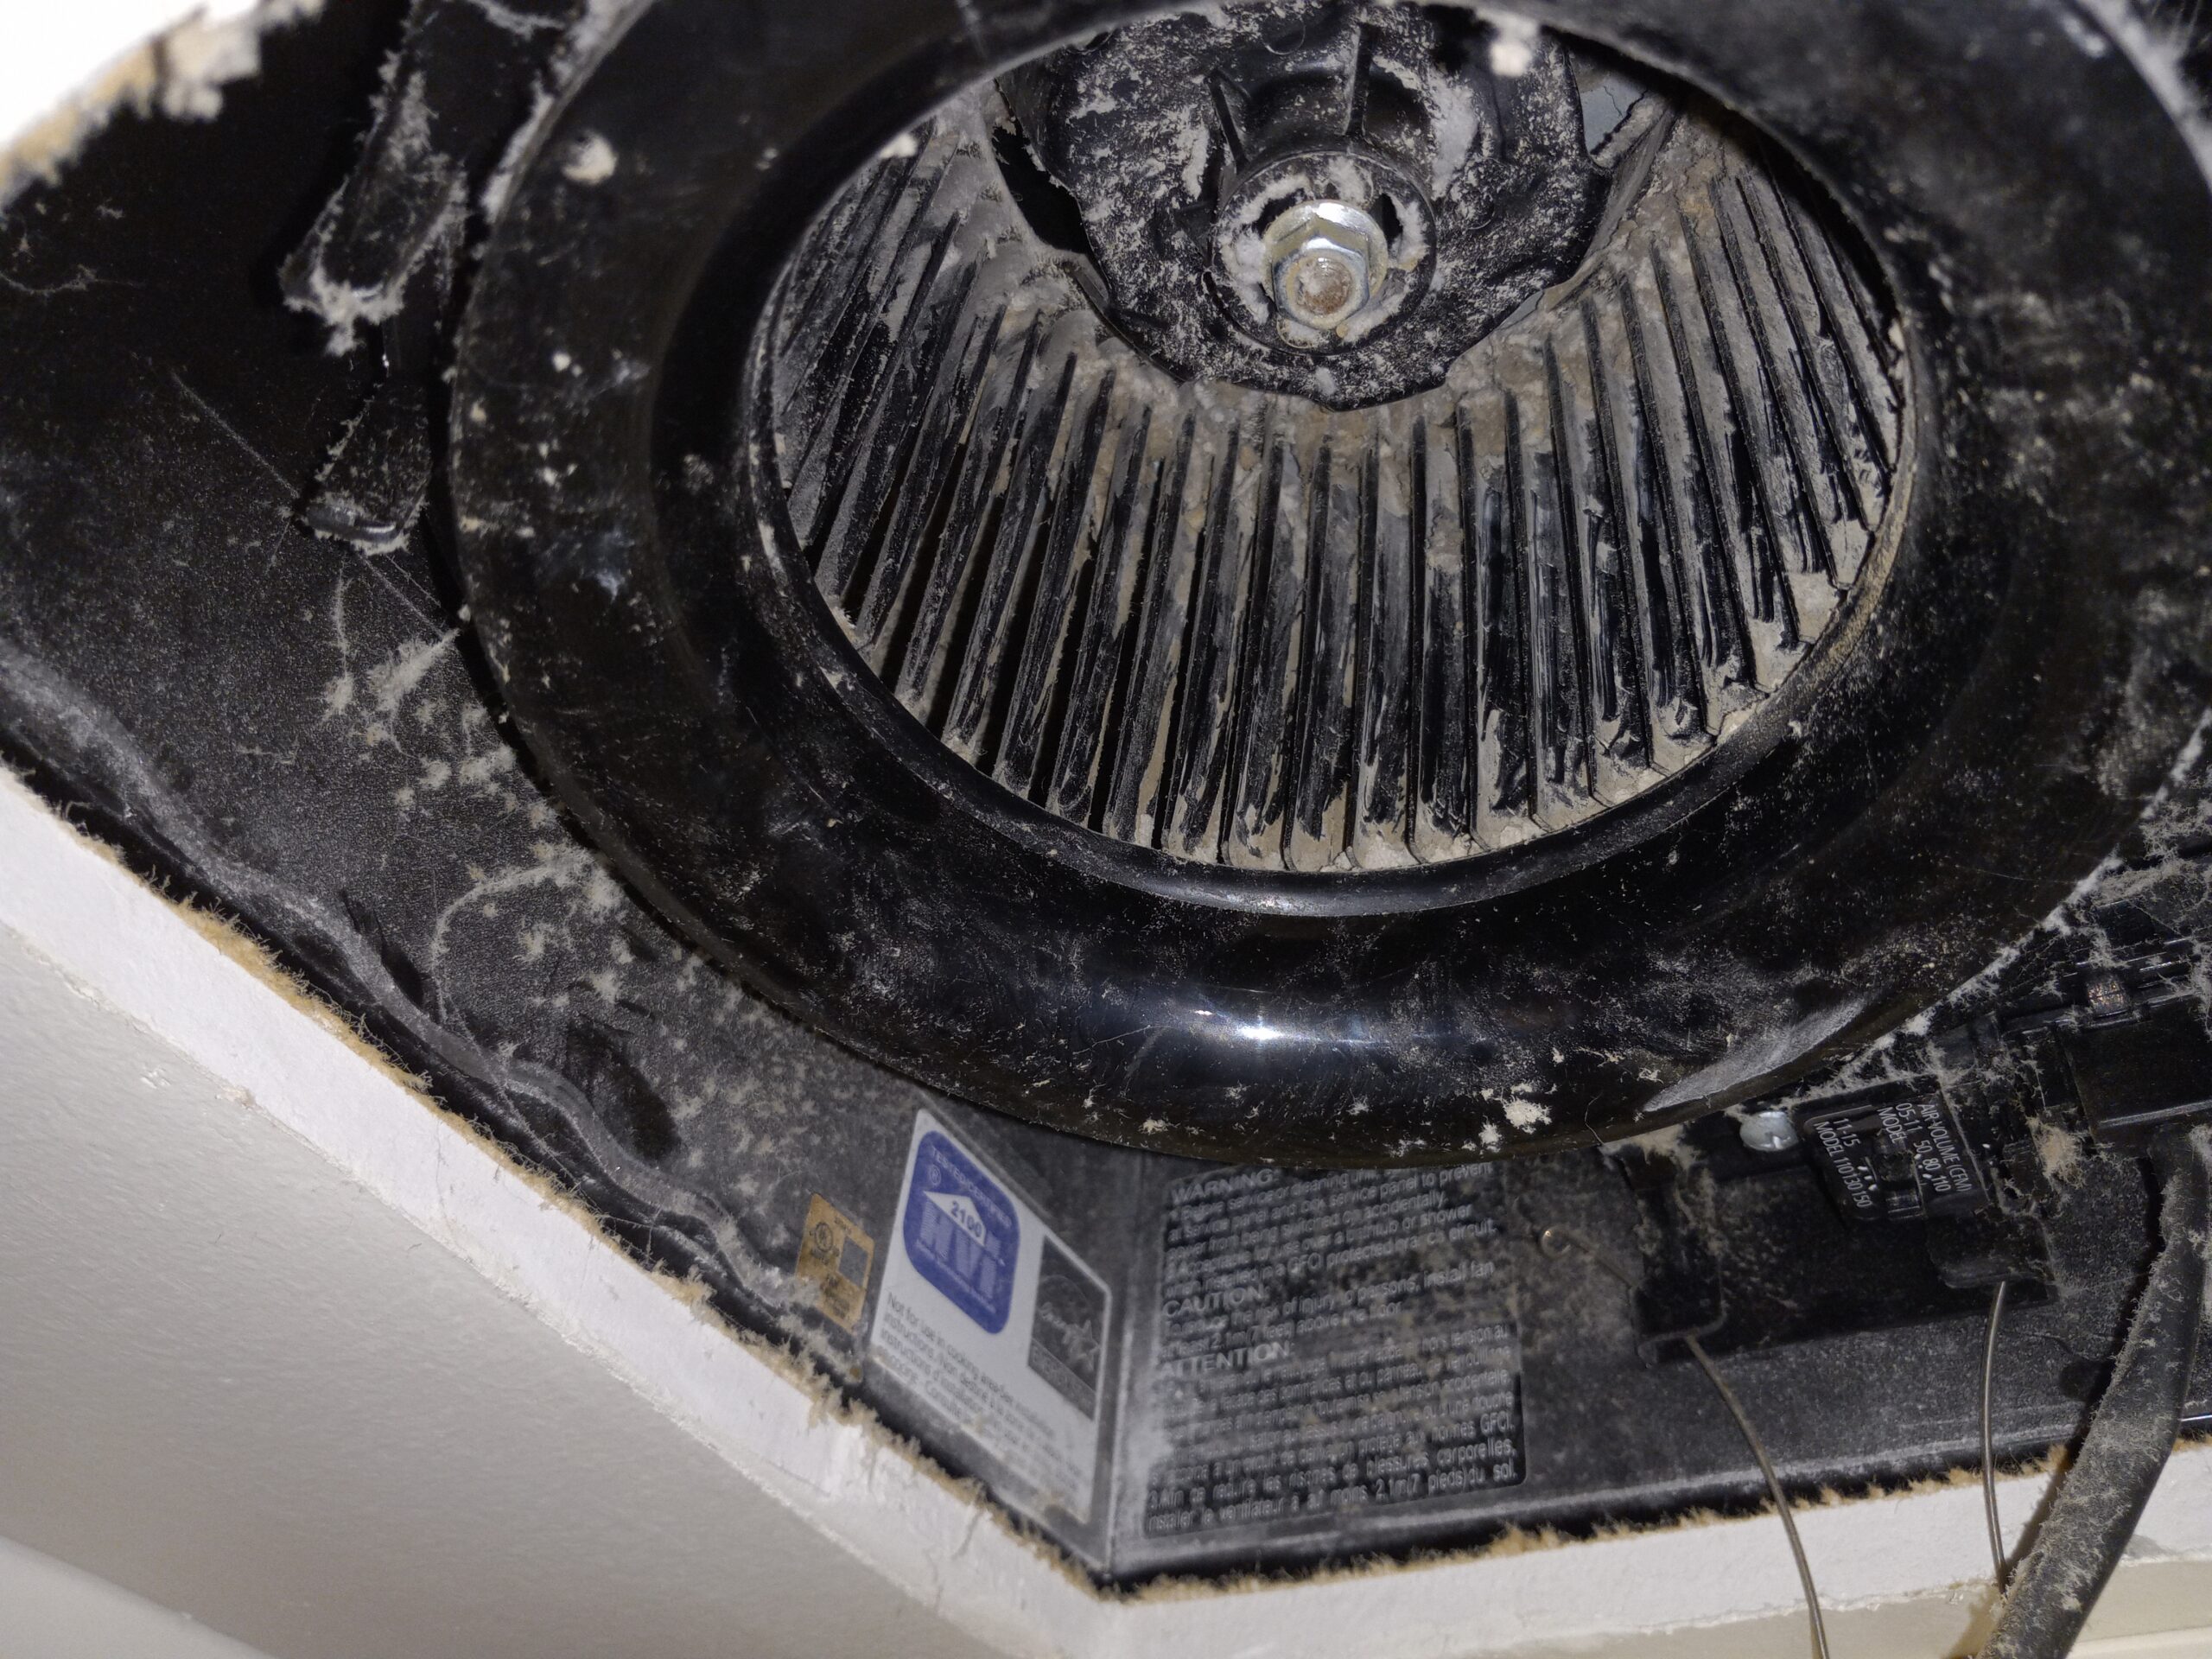
I need to go back with a better tool to get more crud out.   But, below, you can see the proof of the pudding, at least there is enough air movement now to hold a piece of toilet paper in place.

Lock Picking 101 (I’m a Beginner)

Whenever I run a craigslist ad for my handymanning services, I often list “basic locksmithing” as one thing I can do.    Please note, I have a brother who is a master master locksmith so I know full well that I am not such.  But all too often, while I am doing a job, a client will ask, “can you fix THIS?”  and they will point to a doorknob.  So bit by bit, in the “learn by doing” philosophy, I have acquired some very basic locksmithing skills.  These consist mainly of replacing doorknobs, swapping out deadbolt locks, pulling mortise locks (and having a real locksmith replace the innards) and fixing strike plates.  So over time, as more and more clients asked me to fix more and more broken knobs, I started to accumulate basic locksmithing skills.  There is actually a lot to know, even at that basic level.

That said, when the pandemic first hit, it became pretty obvious that handymanning work was going to slow down and I would have some extra time on my hands. So I decided that would be a perfect time to do some things I had always intended to do.

One of these was to learn to play folk guitar, another was to figure out how to dance country 2-step, and the last was . . . How to pick locks.

I can’t remember what made me want to learn lock picking. I probably surfed into a youtube video by “the lock picking lawyer” and got intrigued.

So I invested in a set of lock picking tools:


You really don’t need much for this kind of thing . . . for basic lockpicking all you need is a “tensioning tool” and a pick. I also bought a “rake” but I rarely use it. And some “top of the keyway” tensioning tools are in the mail.

Now please do bear in mind, I am not any sort of lock picking expert, in fact I would call myself (at best) an advanced beginner. I managed to stitch together a collection of old used deadbolts and locking knobs and now, instead of knitting or whittling, whenever I find myself sitting in my easy chair, I compulsively grab a lock and proceed to pick it. Or at least try to. I have successfully picked 80% of the locks I own, at least once. Still, it is a very hit or miss proposition, I have not achieved any mastery so far. But, gotta start somewheres.

The process involves sticking your pick in the lock and acquiring a mental picture of the unique setup of the pins. If you could see the pins it would be easy, but you have to figure them out by feel.

I have been told that a good way to stave off dementia and senility is to keep learning new things. This project is certainly doing that.

Mapping a Panel

Allrighty, today we talk about . . . panel mapping.

Any house that has electricity has a panel full of circuit breakers, and it is oh so very very helpful if those circuit breakers are labeled. Sadly, all too often, panels are installed with no labels, so it falls to someone else to label them down the road.

The reason they need to be labeled is, well, ok, any competent electrician can usually trace a circuit and identify and kill the breaker. The issue is, what if it’s an emergency? In that case, you have to kill ALL of the power with the main shutoff, and now you may not have any lights.

It’s just a good thing to have them all labeled in case a service guy comes to fix the dishwasher, that way he hopefully won’t charge you extra for the time taken to find the breaker before fixing anything.

Also another note, Belmont and Brookline (local towns here) are now requiring all city-permit-issued electrical work to include mapping/ labeling the panel.

Now in my case here today, one of my regular clients has a big (and I do mean big) old Victorian house, and lately I have been having to go over there at all hours to fix heating issues.  AND . . .  the panel is not labeled, so when I am over there at 2 am trying to shut off power to a burst hot water heater, the lack of any labeling has been getting to be a bit of an annoyance. So I finally talked him into letting me do some panel mapping,

Now for all you intolerant electricians out there, please bear in mind, I have been working with a master electrician for 7 years now and I am a de facto trainee and I already know a lot but even then, I only do basic stuff like the occasional switch swap unless he is standing there supervising.  As he was here.

Okay, to illustrate, here is the panel in my own apartment.

Nice, concise, clean, altho I think it could have been done better.   It’s a nice list but one must first locate the name of the appliance or circuit on the top left list, then look at the chart below it to see how the breakers are numbered / laid out, and then go to the breakers themselves and count up from the bottom to find it.  Wouldn’t it be so much better to just have the appliance name right on or next to the breaker??  This is the kind of thing I am trying to make better.

Here is the “before’ shot of the old house panel.

Someone had started to map it but gave up. And the real catalyst here was the marking for “blue boiler” which was NOT connected to the blue boiler. My hair (not pictured) was torn out and on floor. The breaker for that boiler was not even in this panel.

Ok, so here is my nifty little circuit tracer device.

I plug the smaller piece into a receptacle and it sends a signal back to the breaker, and I can detect that signal with the wand portion, and that’s how I can trace the breaker for that circuit.

Here you see the main panel with the cover removed.

As a panel evolves with new circuits added over time, the wires get all over the place and it gets harder to trace the signal so we have to remove the panel to get closer to the actual wire with the wand. Note DO NOT remove your panel cover unless you know what you are doing!!!  Last thing I need is a fricasseed blog reader!!!

We were only tracing the basement circuits, so I would someday be able to kill power to items like boilers and hot water heaters in emergencies. I took some label stock and wrote down notes to stick on the panel. Sloppy, but way better than what I had.

So next, while I will no doubt get chastised by electricians, I also know a “usability expert” (these are people who actually go to college to learn how to make things easier to use) and no doubt I will be hearing from her about what I am doing wrong BUT my plan here is not just to label this one panel, but to label all three panels in the basement, and THEN I plan to post signage on all the basement devices like water heaters etc. to say “power shutoff: Panel A breaker 18″ So even a new service guy will have minimal trouble shutting stuff off as needed. And of course the panels themselves will be named and labeled A, B, and C. And of course I also have to post a legend of where is apt 1, which unit is apt 2, and so one. This was much  more brainwork than I thought it would be!!

So this was the first draft:  Hang on, more to come   

I also posted a printed guide on the insides of the panel door:

And a few days later I printed up some better labels on crack & peel adhesive stock and finally got them in.

Again, it’s not done, and I am still refining my technique, but the key items in the basement (water heaters, boilers, etc.) are finally mapped to their breakers, and someday we will do the rest of the house!

–jl